Bourbon Vanilla Curing Technique
WARNING:
Too young green vanilla beans (below 7 months old) can't be used for Bourbon technique. To find out why - watch the video below
Vanilla curing is not an activity that every vanilla farmer should try to do. This is because very few people have the knowledge, skills, patience, and willingness to give ongoing attention to the details that are necessary to produce high-quality cured vanilla. Processing vanilla is a seven-day-a-week job for three to four months a year.
For most farmers would be best to sell their ripe vanilla beans to professional curers in their area. This may be another farmer, a cooperative of which they are a member, or a buyer/exporter.
Curing of Ripe Vanilla Beans
Curing of vanilla beans is one of the most important processes affecting the final quality of the cured beans. If it is not done properly very poor quality vanilla will be produced even from beans that were of good quality at harvest. The reason that vanilla beans are cured is to produce as much aroma (smell) and flavor (taste) in the beans as possible. When the beans are mature and harvested, there is very little vanilla aroma and flavor in them, this will be formed as the beans are cured.
Vanillin is the main compound in cured vanilla beans that produces the aroma and flavor. The shiny oily or glossy appearance of good quality cured beans is due to the high vanillin content in the beans and is used to assess the quality of cured beans. Good quality cured beans should be long, shiny, oily, dark brown to black in appearance and free of molds and pests. To achieve this, a lot of care needs to be taken during the harvesting and curing of the beans. Cured beans with little vanillin content are dull and lack shine. Very little aroma and flavor can be produced from immature beans. This is why it is important to pick vanilla beans when they are mature (8-9 months old). Unripe beans will end up as poor quality, dry, hard beans with very little aroma and flavor when cured. The curing process recommended in this article is designed to produce as much aroma and flavor as possible in the vanilla beans. To achieve this, the beans have to be kept at the right temperature and the right moisture level for the correct length of time.
There are four main stages in curing vanilla. These are:
- ‘Killing’ or ‘Wilting’ and ‘Initial Sweating’ (keeping the beans hot for two days) - this kills the beans and starts the formation of aroma and flavor.
- ‘Sun Sweating’ - a quick drying period in the sun is followed by a long exposure to the sun inside a blanket. The bean temperature rises to about 60°C and the beans are kept hot overnight. This is repeated every day for about 15 days until the moisture content of the beans falls to about 50%. This is the most delicate stage of the curing, where changes in temperature can dramatically enhance or slow down the formation of aroma and flavor.
- ‘Slow Drying’ - normally carried out inside a well-ventilated room, until the bean moisture content falls to about 18 to 25%. This further increases the vanillin content of the beans.
- ‘Conditioning’ - the beans are stored in airtight containers for a period of about three months to allow the full development of the aroma without any further loss of moisture. There are a number of methods used around the world to cure vanilla. Good quality beans can be obtained from different curing techniques, as long as the stages described before are undertaken. NARI LAES recommends that vanilla be cured using the Bourbon method. This method will consistently produce good quality cured beans from both Planifolia and Tahitensis vanilla under conditions in Indonesia. The Bourbon method is described below.
Vanilla Curing Equipment & Procedures
The following outlines the equipment and the curing techniques needed to properly cure vanilla to premium export quality.
Stage 1: Hot Water Killing (Scalding)

Equipment needed:
- Saucepan or container to heat water
- Gas burner or fire
- Mesh basket for beans
- Thermometer for water
- Watches
- Insulated box A (esky)
- Wool or cotton blankets/towels
What to do:
- Harvest ripe beans
- Sort vanilla beans by type, size and quality (this is called grading)
- Half fill the mesh basket with the same grade of vanilla beans
- Heat water to 63°C and check the water temperature with the thermometer
- Scald the beans by putting the mesh basket with vanilla beans in the hot water for about three minutes (time with the watch)
- Place the hot vanilla beans into a blanket/towel or plastic sheet, wrap tightly and store in the insulated box A for two days (close box the with the lid)
- Bottles of hot water (63°C) can also be put in the insulated box to help keep the beans warm

Stage 2: Sun Sweating
Equipment needed:
- Trays
- Blankets and plastic sheets
- A sunny area covered with clear roofing or plastic (preferably with benches under it)
- Insulated box B (esky)
What to do:
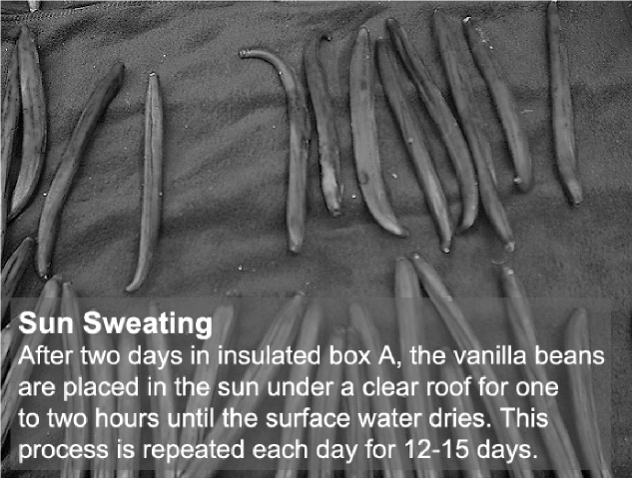
- After 48 hours (two days) in the insulated box A, open the box and put the beans in the sun under the clear roof until the surface water on the beans dries (one to two hours)
- As soon as the vanilla surface is dry, re-wrap the beans in blankets or plastic and leave in the sun under the clear roof to heat and continue sweating
- Store the vanilla in the insulated box B (esky) overnight
- Bottles of hot water (63°C) can also be put in the insulated box B to help keep the beans warm
- Repeat this operation each day for 12-15 days, until the vanilla moisture content falls to 50%. When the bean’s moisture content falls to 50%, they are wrinkly and when rolled between the fingers have a soft feel inside. Above 50% moisture content, you will feel some stiffness inside the bean.
Stage 3: Slow In Shed Drying
Equipment needed:
- Well-ventilated, dry room
- Shelves
- Trays
What to do:
- When bean moisture content falls to 50%, they are placed on open trays in a well-ventilated, dry room
- Beans are checked every day for moisture content and mold
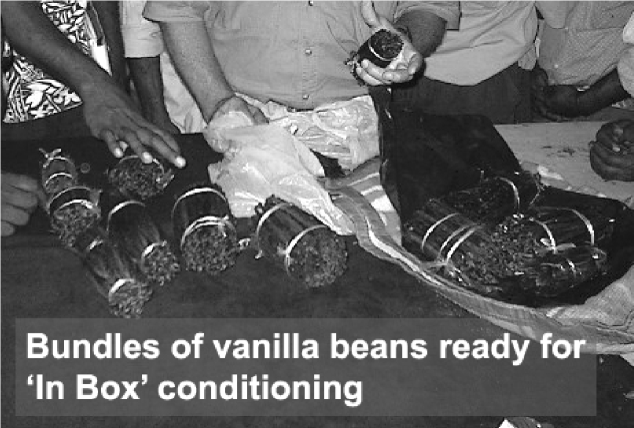
- When the bean’s moisture content falls to 18-25% (the beans are flexible when rolled between the fingers, but there is resistance and no soft feel inside), they are bundled together with vanilla beans of similar size and quality ready for ‘In Box’ conditioning
Stage 4: ‘In Box’ Conditioning
Equipment needed:
- Well-ventilated, dry room
- Shelves
- Hardwood boxes with airtight lids
- Wax paper
What to do:
- Line the boxes with wax paper and tightly fill them with the vanilla bundles
- Cover with wax paper and the airtight lid
- Check beans once a week for moisture content, molds and pests
- Re-dry on sun if necessary
- After conditioning, the cured beans are packed as per the buyer’s requirements and sold
Nine important things to remember:
- Only harvest ripe beans
- Grade and sort the beans before curing
- Scald the beans in hot water at 63°C for about three minutes
- When sweating beans, use an insulated box (esky) and keep the temperature at 40-60°C
- During the sun sweating phase only dry the surface of the beans (one to two hours), then wrap and leave in the sun to heat up for the rest of sun hours
- Surface dry and heat the wrapped beans every day until the moisture content falls to 50%
- Sweat the beans every night until the moisture content falls to 50%
- Slowly dry the beans in open trays in a well-ventilated, dry room when the bean moisture content falls to 50% and inspect the beans daily
- When moisture content falls to 18 to 25% put in lined boxes to finish curing and inspect weekly
Time required for Curing Activities
The following is a guide to the time required for each step of vanilla curing. Note that some of the times will vary depending on weather conditions. The required time commitment to cure a batch of harvested beans will be on average a hundred days (over three months). During this time the curer needs to pay full attention to the curing process, which may be difficult for many farmers.
Day 1: Scalding
- Harvest ripe beans only
- Grade and sort the vanilla beans
- Kill by scalding beans in hot water at 63°C for about three minutes
- Wrap in a blanket and put in an insulated box (esky)
Day and night 1-2: ‘In Box’ Sweating (fermenting)
- Keep the wrapped beans in the insulated box hot (40-60°C) for two days to sweat
Day 3-15: Curing Phase
- Dry beans on the sun (one to two hours)
- Wrap in sun for rest of sun hours (60°C)
Night 3-15: ‘In Box’ Sweating
- Sweat the wrapped beans overnight in the insulated box at 40-60°C
Days 16-100: ‘In Shed’ Curing and ‘In Box’ Curing
- When bean moisture content falls to 50%, slowly dry beans in open trays in a well-ventilated, dry room
- Inspect beans daily
- Check moisture content
- Put beans in the sun to dry for an hour or so if they have taken up moisture and remove any moldy beans
- When moisture content falls to 18 to 25%, put in lined boxes to finish curing
- Inspect beans in conditioning boxes weekly to check moisture content, molds and pests, remove damaged beans and re-dry on the sun if necessary